Last Updated on August 5, 2026 by andy woo
- 01 1. Where Do Lost PowerPoint Files Go? (Can They Be Recovered?)
- 02 2. Method 1. Recover Lost or Deleted PowerPoint Files with iFinD
- 03 3. Method 2. Restore Deleted PPT Files from the Recycle Bin
- 04 4. Method 3. Recover Unsaved PowerPoint Files (AutoRecover Pane)
- 05 5. Method 4. Find the "UnsavedPresentations" Folder
- 06 6. Method 5. Recover PowerPoint from Temporary Files (.tmp)
- 07 7. Method 6. Recover an Overwritten PowerPoint File (Previous Versions)
- 08 8. Method 7. Repair a Corrupted PPT File (The "Reuse Slides" Trick)
- 09 9. How to Prevent PowerPoint File Loss
- 10 10. Conclusion
- 11 11. Frequently Asked Questions (FAQs)
If your slide deck just vanished due to a sudden app crash, an accidental "Don't Save" click, or a mistaken deletion, you need to act quickly to recover the PowerPoint file before the data is overwritten.
Because of how Microsoft Office and Windows manage storage, those missing slides are almost always still sitting in a temporary cache or an unallocated drive partition. This guide covers exactly how to retrieve lost, unsaved, or corrupted .pptx and .ppt files, starting with the storage mechanics of your lost presentation.
1. Where Do Lost PowerPoint Files Go? (Can They Be Recovered?)
Knowing how your computer handles sudden data loss makes it much easier to pick the right recovery method. Just like when you need to recover Word documents or salvage unsaved Excel spreadsheets, PowerPoint relies on structured temporary caches to protect your active workspace.
The exact location of your missing data—and the method you should use to get it back—depends entirely on whether you had saved the presentation at least once before it disappeared.
- When PowerPoint crashes mid-edit: The app actively writes background state changes into hidden
.tmpfiles. If the program closes abruptly, these temporary drafts remain saved in your system's AppData directory until reopened. - When you close without saving: Hitting "Don't Save" on a brand-new presentation bypasses your standard save folders. Instead, an auto-generated draft is temporarily held in a dedicated UnsavedPresentations cache.
- When a file is deleted or formatted: Emptying the Recycle Bin only removes the file's index marker, freeing up the space for new data. Raw data recovery tools can often reconstruct the original
.pptxcontainer—though large files with embedded media occupy more storage clusters, making them more likely to be partially overwritten and trickier to fully recover than plain text documents.
💡 Golden Rule of Data Recovery: The moment you realize a presentation is missing, stop saving new files, downloading media, or installing software on the affected drive. Continued disk activity is the #1 reason temporary caches and deleted sectors get permanently overwritten.
2. Method 1: Recover Lost or Deleted PowerPoint Files with iFinD
Deleted a crucial presentation? Formatted the wrong USB drive? Even if a PowerPoint file shows corruption errors, the raw data—or an older temporary version—usually still exists on your hard drive. iFinD Data Recovery can deep-scan your storage device to rescue permanently deleted .pptx or .ppt files, or find hidden .tmp backups of corrupted slide decks.
When Should You Use a Professional PPT Recovery Tool?
Skip the manual caches and use iFinD Data Recovery immediately when:
- Permanently Deleted: You emptied the Recycle Bin or used Shift + Delete on a PowerPoint file.
- Formatted Storage: The USB flash drive or SD card holding your slide deck was accidentally formatted.
- Lost Without Backup: Your presentation vanished after a hard crash, and the Office AutoRecover pane is completely empty.
- Severe File Corruption: PowerPoint refuses to read the file, and the native "Reuse Slides" trick cannot parse the data.
STEP 1 Stop Using the Drive Where the PowerPoint File Was Stored
If you keep using the drive—saving files, downloading programs—you risk overwriting the exact presentation data you're trying to recover. So stop immediately. Don't save anything new to that disk.
If the lost presentation was on an external USB flash drive or SD card, connect it to your computer now.
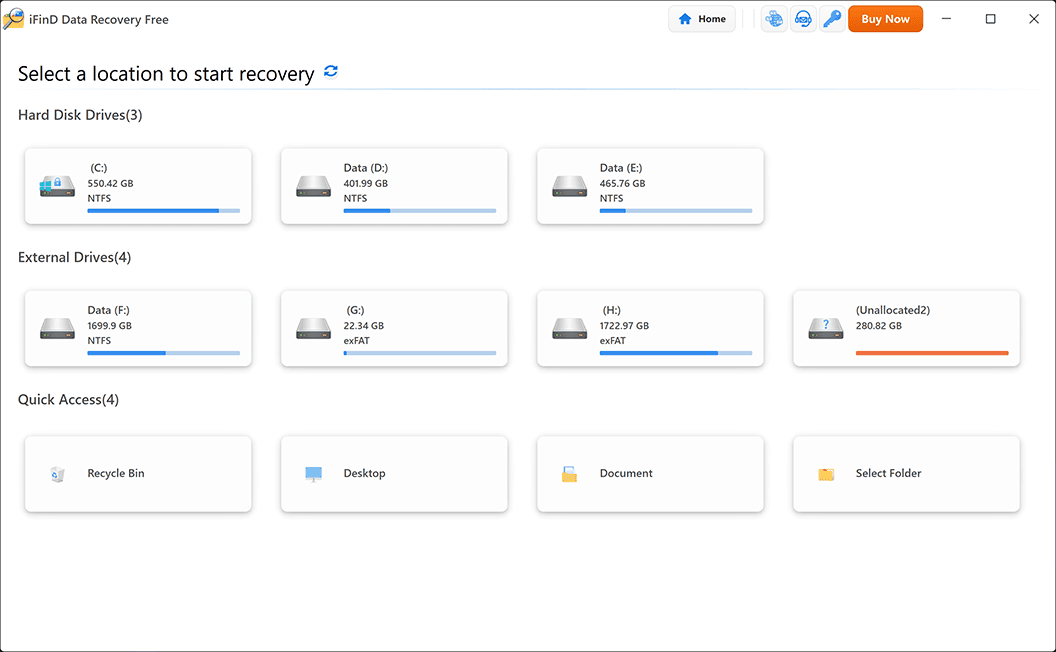
STEP 2 Launch iFinD Data Recovery and Select the Location
Launch iFinD Data Recovery on your Windows PC. From the main interface, select the specific hard drive partition, USB drive, or even the Recycle Bin where you last saved the PowerPoint file.
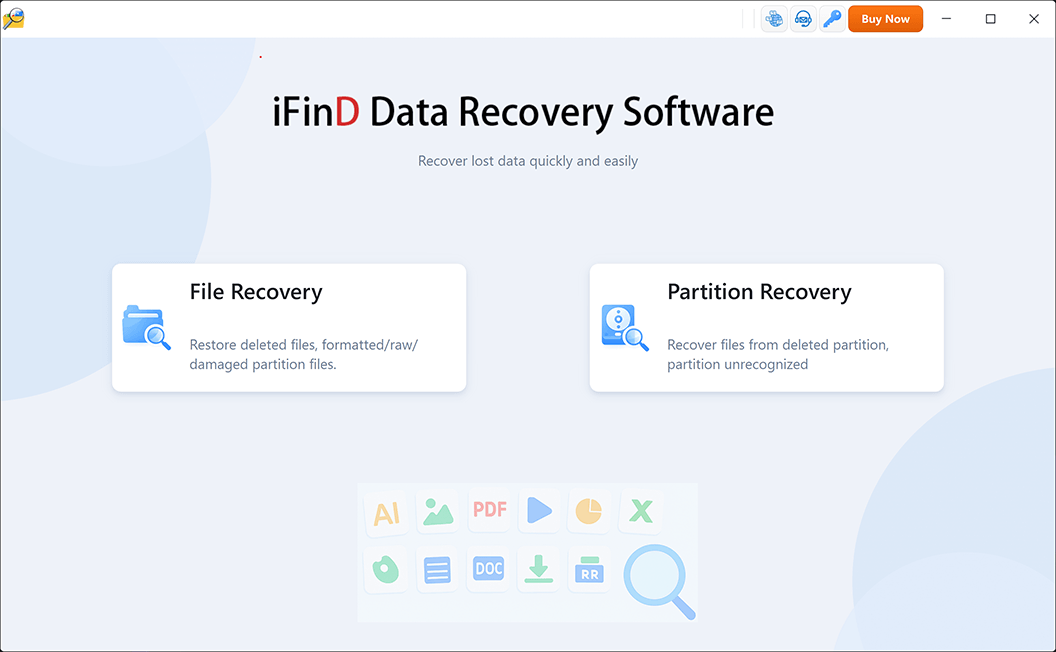
STEP 3 Choose File Recovery or Partition Recovery Mode
Select the recovery mode based on how you lost the presentation:
Option 1: File Recovery (Recommended)
Choose File Recovery if you accidentally deleted the PowerPoint file, emptied the Recycle Bin, or if you are looking for an older, uncorrupted version of a damaged slide deck. This mode performs a deep scan for specific file signatures.
Option 2: Partition Recovery
Choose Partition Recovery if your entire drive letter has disappeared, or if the USB drive storing your presentations is now asking to be formatted (RAW drive error).
STEP 4 Scan for Missing PowerPoint Presentations
Start the scan. iFinD will dig through the drive to find recoverable presentations. To speed things up, use the built-in filter to show only Document types (like .ppt, .pptx), or type a specific file name into the search bar.
STEP 5 Preview Slide Content and Recover
One thing that makes this step less stressful: iFinD lets you preview the actual visual slides inside a recovered PowerPoint file before you restore it. Double-click any found file to check the layouts and text—this way you know for sure it's the right deck and not corrupted by missing media clusters.
Once you've confirmed it's the right presentation, select it and click Recover.
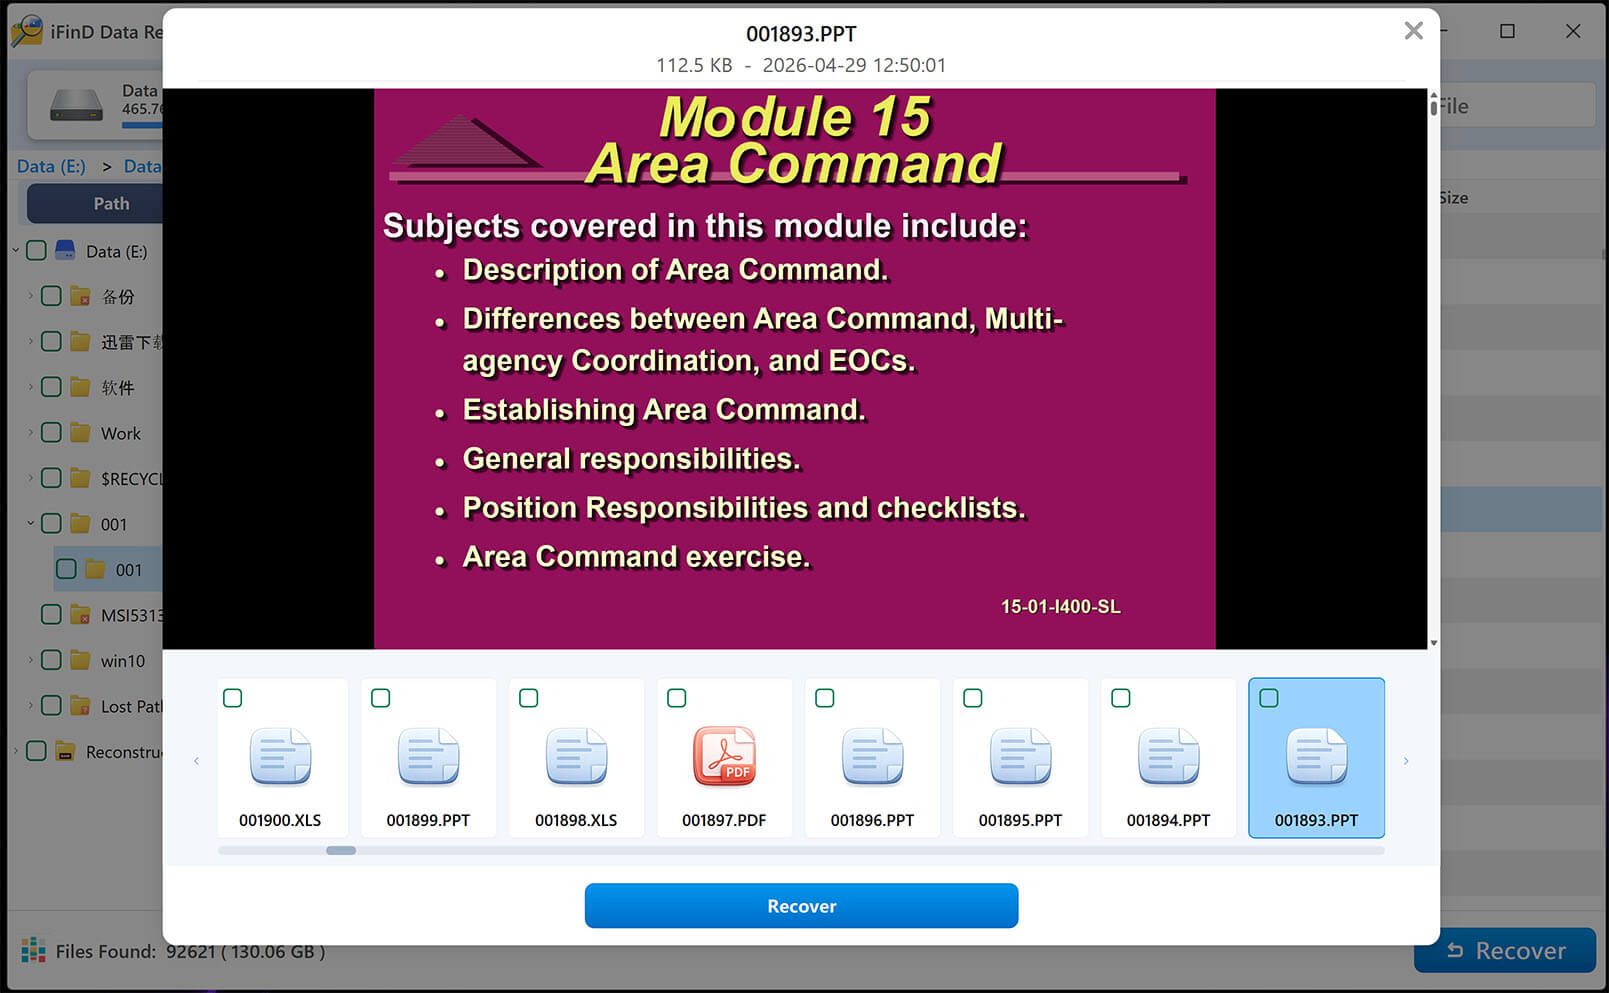
⚠️ Important: Do not save the recovered PowerPoint files back to the same partition where they were lost. Always choose a different drive or an external USB to prevent overwriting.
Besides PowerPoint presentations, iFinD Data Recovery can also help you restore other Office files when important business data goes missing. If you also lost important emails, see our guide on deleted email recovery to learn how to restore missing messages. If you've lost vital text documents, you can use the same deep-scan approach to recover Word documents. The same goes for spreadsheets—check out our guide on how to recover Excel files for step-by-step instructions tailored to that format.
3. Method 2: Restore Deleted PPT Files from the Recycle Bin
If you accidentally deleted a PowerPoint presentation using the standard Delete key, the Windows Recycle Bin should be your first stop. However, if the file was deleted from an external USB drive or SD card, it bypasses the Recycle Bin entirely. In that scenario, you need to jump straight to Method 1.
- Double-click the Recycle Bin icon on your Windows desktop.
- Look for your missing presentation. If the folder is cluttered, right-click anywhere in the empty space, select Sort by, and click Date deleted to bring the most recently deleted items to the top.
- Right-click the
.pptxor.pptfile and select Restore. The presentation will instantly return to the exact folder it was originally deleted from.
4. Method 3: Recover Unsaved PowerPoint Files (AutoRecover Pane)
When PowerPoint crashes in the middle of an edit, the application usually has a backup waiting for you upon restart. This relies on the AutoRecover feature, which saves temporary background drafts based on your configured AutoRecover interval.
- Reopen the PowerPoint application.
- Look at the left side of the screen for a panel named Document Recovery.
- You will see a list of available backups, often labeled with [original] or [recovered] alongside a timestamp.
- Click on the version with the most recent time to open it.
- Once you verify the slides are intact, immediately go to File > Save As to save the presentation to a secure, permanent location.
💡 Note: If this pane doesn't appear, it likely means the crash happened before AutoRecover had a chance to save its first draft, or the feature is disabled in your settings. Check File > Options > Save to confirm it is turned on, or proceed to Method 4 to check the manual caches.
5. Method 4: Recover via the "Unsaved Presentations" Feature
What if you spent an hour tweaking a new slide deck, but accidentally clicked "Don't Save" when closing the window? The Document Recovery pane won't trigger for files you explicitly chose not to save, but Microsoft Office still keeps a hidden draft for a short period in a dedicated cache.
- Open a blank PowerPoint presentation.
- Click the File tab in the top-left corner, then select Info from the left-hand menu.
- Click the Manage Presentation button.
- Select Recover Unsaved Presentations from the dropdown menu.
- A File Explorer window will open, pointing directly to the hidden
UnsavedFilesdirectory where Office stores these temporary drafts. - Look for a file matching the time you closed the document, select it, and click Open.
- PowerPoint will open the file with a yellow warning banner across the top. Click the Save As button in that banner to permanently secure the file.
Still no luck? The draft might have already been cleared from this specific directory. Move on to Method 5 below to manually dig through deeper Windows temporary folders.
6. Method 5: Recover PowerPoint from Temporary Files (.tmp)
When the official Office panels come up empty, you have to dig into the system's backend. Windows constantly generates hidden background files while you build your deck. If a hard crash wipes your progress, these raw temporary caches sometimes survive.
- Press Windows Key + R to open the Run dialog box.
- Type
%temp%and press Enter to open the local Windows Temp directory. - Use the search bar and type
ppt*.tmp, or sort the folder by Date modified to locate files matching the exact time of the crash. - Copy the matching
.tmpfile and paste it onto your Desktop for safekeeping. - Open a blank PowerPoint window, and go to File > Open > Browse.
- In the bottom right corner of the file explorer window, change the file type dropdown from All PowerPoint Presentations to All Files (*.*).
- Select your copied
.tmpfile and click Open to see if PowerPoint can parse the data.
💡 Note: If the Temp folder is completely empty, a background maintenance tool (like Storage Sense) might have wiped it. In that case, use Method 1 to scan the drive, or read our deeper guide on recovering deleted files.
7. Method 6: Recover an Overwritten PowerPoint File (Previous Versions)
Pressing Ctrl + S right after wrecking your slide master is a terrible feeling. If you need to undo a saved overwrite, you can roll back to a historical snapshot. For local drives, this only works if you previously enabled Windows File History or System Protection.
For local files (Windows Previous Versions):
- Navigate to the folder where the overwritten presentation is saved.
- Right-click the file and select Properties (Windows 11 users: click Show more options first).
- Click the Previous Versions tab to view available historical states.
- Select the target version.
(Important: Do not click "Restore" directly, as it will instantly overwrite your current draft. Instead, click Copy... or simply drag the version from the list onto your Desktop to compare the two.)
For cloud files (OneDrive Version History):
- Open the overwritten presentation in PowerPoint.
- Click File > Info and select Version History.
- A right-hand panel will display older iterations. Click Open version on the one you want to review.
8. Method 7: Repair a Corrupted PPT File (The "Reuse Slides" Trick)
There's a specific scenario where you successfully rescue a missing presentation, but clicking it triggers the dreaded "PowerPoint found a problem with content" error. Because a .pptx file is essentially a ZIP archive containing XML code and media folders, slight structural damage to the outer container will block the file from opening normally.
Instead of struggling with third-party repair tools, you can often bypass the broken container and pull the raw, healthy slides directly into a new document.
- Create a completely blank presentation in PowerPoint.
- On the Home tab, click the text label beneath the New Slide button and select Reuse Slides.
- In the side panel, click Browse and locate your corrupted presentation.
- At the bottom of the panel, check Keep source formatting to prevent the imported slides from adopting the blank, plain theme.
- Right-click any slide in the preview pane and choose Insert All Slides. PowerPoint will extract the raw slide data and reconstruct it in your fresh document.
⚠️ What if this fails?
If PowerPoint cannot parse the file enough to generate a preview, the internal XML structure is severely broken. Your best bet is using a deep-scan tool like iFinD Data Recovery to search the drive's free space for an older, uncorrupted temporary version. This exact same deep-scan logic also applies if you need to salvage raw design assets or recover deleted photos that were embedded inside the broken deck.
9. How to Prevent PowerPoint File Loss
PowerPoint crashes a lot more often than Word or Excel simply because high-resolution images and embedded videos eat up so much memory. To protect your work from unexpected crashes, take a few minutes to set up these built-in safeguards:
- Compress Media Before Saving: Bloated presentations are the number one cause of memory errors and save failures. Go to File > Info > Compress Media to reduce the file size and keep the app running smoothly.
- Enable OneDrive AutoSave: If you use Microsoft 365, saving your file directly to OneDrive turns on real-time AutoSave. Unlike the traditional AutoRecover timer, AutoSave syncs your changes almost continuously as you work.
- Lower the AutoRecover Interval: If you prefer saving locally, go to File > Options > Save and reduce the "Save AutoRecover information every" setting from the default 10 minutes down to 3 or 5 minutes.
10. Conclusion
Seeing a massive slide deck vanish is stressful, but successful PowerPoint file recovery is usually just a matter of knowing where to look. Whether your slides are temporarily hiding in an UnsavedPresentations folder or you need a tool like iFinD Data Recovery to rebuild the raw file from the drive's free sectors, you have a solid chance of getting everything back.
💡 Office File Recovery Hub: Presentation recovery is just one piece of the puzzle. If you regularly work within Microsoft's ecosystem, understanding how to manage sudden data loss across all applications is critical. For a complete breakdown, check out our comprehensive Office File Recovery Hub, where we cover everything from salvaging corrupted Word documents and Excel spreadsheets to retrieving deleted Outlook emails.
11. Frequently Asked Questions (FAQs)
Can I recover a PowerPoint if I accidentally clicked "Don't Save"?
Yes, but the exact path depends on your save history. If it was a brand-new presentation, Office keeps a temporary draft—open a blank deck and go to File > Info > Manage Presentation > Recover Unsaved Presentations (see Method 4). If you had saved the file previously but missed your latest edits, check the Document Recovery pane instead (Method 3).
Why does my recovered PowerPoint show blank slides?
This happens for two main reasons. First, if your slides used linked (rather than embedded) images and the original source files were moved or deleted, the slides will appear blank—check your image link settings. Second, if the internal XML structure is actually corrupted, you can bypass the broken file by using PowerPoint's Reuse Slides feature (Method 7) to extract the healthy text and layouts into a new presentation.
Where are PowerPoint temp files stored in Windows?
Standard background temporary files are stored in your local Temp directory (Method 5), which you can access by typing %temp% in the Run box. Temporary AutoRecover backups for files you were actively editing are typically saved in C:\Users\Username\AppData\Roaming\Microsoft\PowerPoint\. Completely unsaved drafts are held in a separate cache at C:\Users\Username\AppData\Local\Microsoft\Office\UnsavedFiles\.
Can I recover a PPT from a formatted USB flash drive?
Yes, but not through the Windows Recycle Bin, as external drives bypass it entirely. You will need to use raw data recovery software (like Method 1) to scan the formatted USB drive and rebuild the original presentation from the unallocated sectors. Remember to stop using the USB drive immediately to prevent data overwriting.