Last Updated on August 5, 2026 by andy woo
- 011. Why Are Word Documents Lost, Deleted, or Corrupted?
- 022. Can You Recover or Repair a Damaged Word Document?
- 033. Method 1. Recover Deleted or Lost Word Files with iFinD Data Recovery
- 044. Method 2. Recover Unsaved Word Documents with AutoRecover
- 055. Method 3. Recover Deleted Word Documents from the Recycle Bin
- 066. Method 4. Repair Corrupted Word Files with Microsoft Word Open and Repair
- 077. Method 5. Recover Text from a Corrupted Word Document
- 088. Method 6. Restore Previous Versions of Word Documents
- 099. Method 7. Fix Disk Errors That Cause Word File Corruption
- 1010. How to Prevent Word File Loss
- 1111. Frequently Asked Questions
1. Why Word Documents Get Lost, Deleted, or Corrupted (and How Recovery Works)
The screen goes dark right as you're wrapping up a quarterly report. Or you empty the Recycle Bin and a split second later realize your final draft was in there. We've all had moments like these. Before you jump into technical Word document recovery steps, it's worth pausing to figure out what actually happened to your file. The right fix is completely different depending on which of these three situations you're in:
You Deleted a Word Document (or Formatted the Wrong Drive)
Human error causes more lost documents than anything else—maybe a stray keyboard shortcut on the wrong folder, or an accidental format. Here's the thing most people don't realize: Windows doesn't immediately destroy your data. It just marks that space as free, and your file sits there until something new overwrites it. That's why it's often possible to recover deleted files on Windows or even pull off a full partition recovery. I've seen documents come back days after deletion, as long as the drive wasn't hammered with new writes. Run a deep scan with decent recovery software before you give up—it'll usually find your file if you act quickly.
Word Crashed Before You Hit Save—Now What?
A sudden power cut, a frozen system, and you're forced to kill Microsoft Word without saving. In this scenario, traditional file recovery tools generally won't help. The reason is simple: if this was a brand-new document you'd never saved at all, no .docx file ever existed on your hard drive, so there's nothing for an undelete tool to rebuild. (If you had saved the file before and Word crashed mid-edit, the last saved version is still sitting on your drive—it's the newer, unsaved changes you're missing.) Either way, your best bet is tracking down temporary cache files (.tmp) or digging into Word's built-in AutoRecover folders. If you've ever stared at a crashed screen wondering whether to force-quit, you know the dread—but those temp files can be a lifesaver when unsaved Word document recovery is your only option. For a deeper dive into how temporary files and residual data work on your drive, check out this guide on recovering data from a hard drive.
Corrupted Word Document? Unreadable Content Errors Explained
Sometimes the file is right where you left it, but opening it throws up a Word document unreadable content error. Under the hood, a .docx file is really a ZIP archive containing several XML components (like document.xml and styles.xml). If your hard drive develops bad sectors, or if you yank a USB flash drive out while Word is still writing to it, the ZIP structure or the XML inside can break. That leaves you with a corrupted Word document. The damage might be physical—actual bad sectors—or purely logical from an interrupted save. Either way, the file itself is broken. Your recovery options at this point boil down to extracting whatever readable text you can from the damaged archive, or restoring a healthy previous version of the file. If the corruption runs deep and extraction doesn't work, broader data recovery techniques can sometimes help salvage what's left.
2. Can You Recover a Deleted, Unsaved, or Corrupted Word Document?
Short answer: usually, yes. But the method you pick makes all the difference—use the wrong one, and you might waste time or, worse, overwrite the very file you're trying to save. What works depends almost entirely on what actually happened to your document.
Here's a quick way to match your situation to the right fix:
| If your Word document is… | The correct solution is… |
|---|---|
| Deleted or Formatted | Stop using the drive immediately and run professional recovery software (Method 1) before new data overwrites the space. |
| Unsaved (Crash/Power Loss) | Dig into Microsoft Word's built-in AutoRecover folder or .tmp files (Method 2). |
| Corrupted / Unreadable | Try Word's native "Open and Repair" feature (Method 4) for minor structural damage—it doesn't always work, but it's the easiest first move. If that fails, extract raw text from the broken file. |
| Overwritten (Saved over old text) | Restore an older draft using Windows Previous Versions (Method 6). (Note: This only works if File History or System Protection was already enabled.) |
Repair vs. Recovery: What's the Difference (and Why It Matters)
Recovery software rescues lost or deleted files from a storage device. It can't reach inside a damaged .docx container and fix broken XML code—that's a repair job, not a recovery one.
That doesn't mean recovery software is useless for corrupted files. If the document is severely damaged and Word's built-in repair tools fail, your best data recovery strategy shifts to a workaround: scan the drive for an older, uncorrupted version of that same file, or hunt down the hidden temporary files Word creates while you work. You're not fixing the broken file; you're replacing it with a healthy copy you didn't know you still had.
3. Method 1. Recover Deleted or Lost Word Files with iFinD Data Recovery
Deleted a Word document? Formatted the wrong drive? Even if a file shows "unreadable content," the raw data—or an older temporary version—usually still exists on your hard drive. iFinD Data Recovery can deep-scan your storage device to rescue permanently deleted .docx files or find hidden .tmp backups of corrupted documents.
STEP 1 Stop Using the Drive Where the Word File Was Stored
If you keep using the drive—saving files, downloading programs—you risk overwriting the exact data you're trying to recover. So stop immediately. Don't save anything new to that disk.
If the lost file was on an external USB flash drive or SD card, connect it to your computer now.
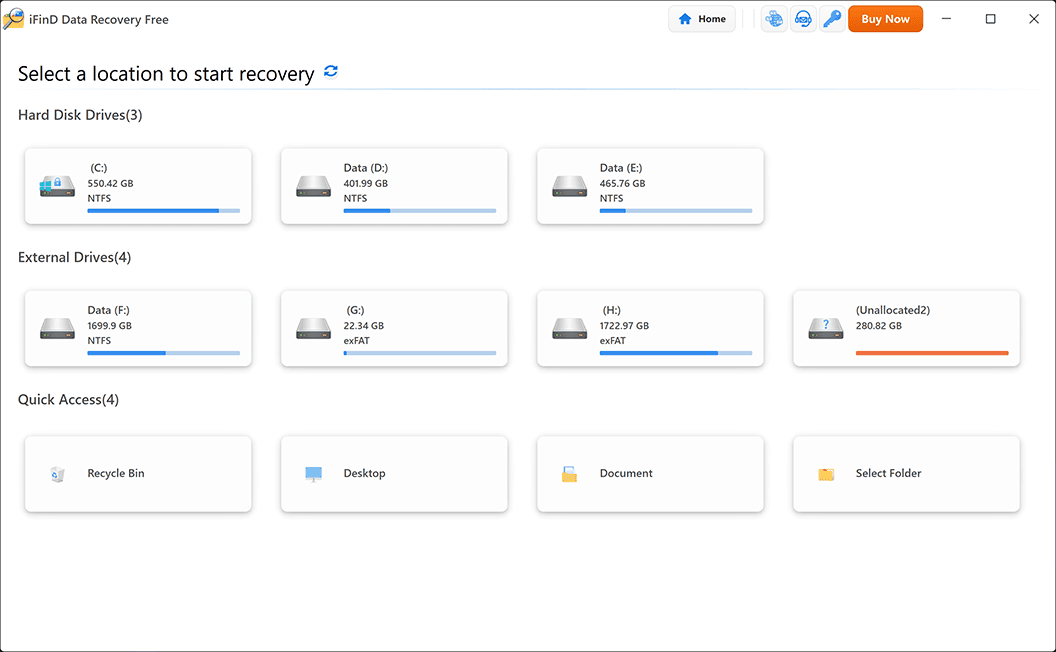
STEP 2 Launch iFinD Data Recovery and Select the Location
Launch iFinD Data Recovery on your Windows PC. From the main interface, select the specific hard drive partition, USB drive, or even the Recycle Bin where you last saved the Word document.
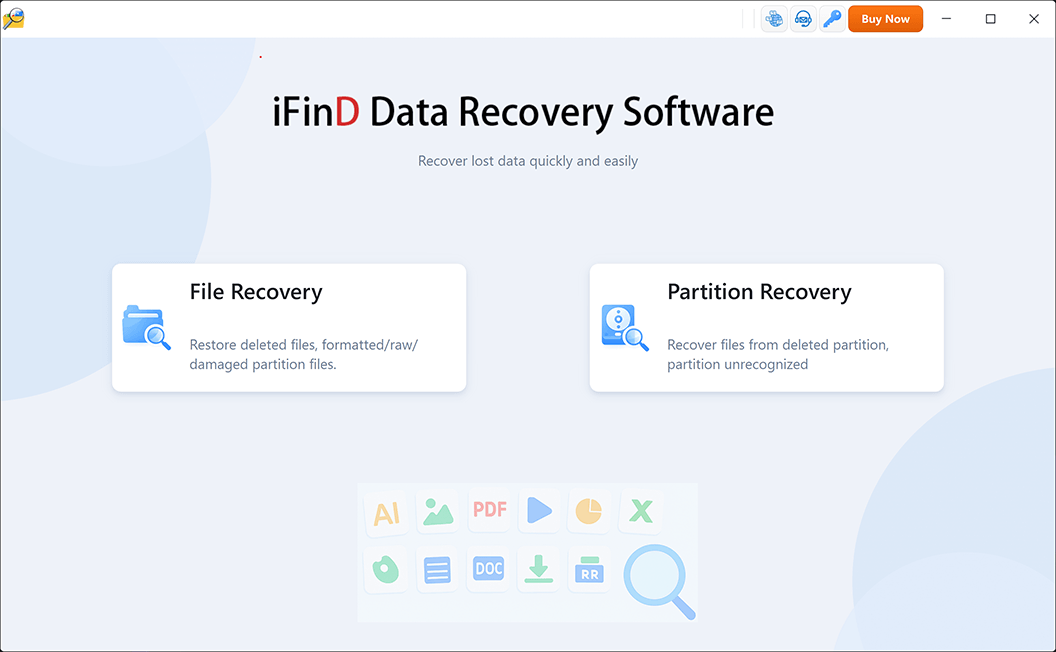
STEP 3 Choose File Recovery or Partition Recovery Mode
Select the recovery mode based on how you lost the Word document:
Option 1: File Recovery (Recommended)
Choose File Recovery if you accidentally deleted the Word file, emptied the Recycle Bin, or if you are looking for an older, uncorrupted version of a damaged document. This mode performs a deep scan for specific file signatures.
Option 2: Partition Recovery
Choose Partition Recovery if your entire drive letter has disappeared, or if the USB drive storing your Word files is now asking to be formatted (RAW drive error).
STEP 4 Scan for Missing Word Documents
Start the scan. iFinD will dig through the drive to find recoverable documents. To speed things up, use the built-in filter to show only Document types (like .doc, .docx), or type a file name into the search bar.
STEP 5 Preview Office Content and Recover
One thing that makes this step less stressful: iFinD lets you preview the actual text inside a recovered Word document before you restore it. Double-click any found file to read the content—this way you know for sure it's the right draft and not corrupted.
Once you've confirmed it's the right file, select it and click Recover.
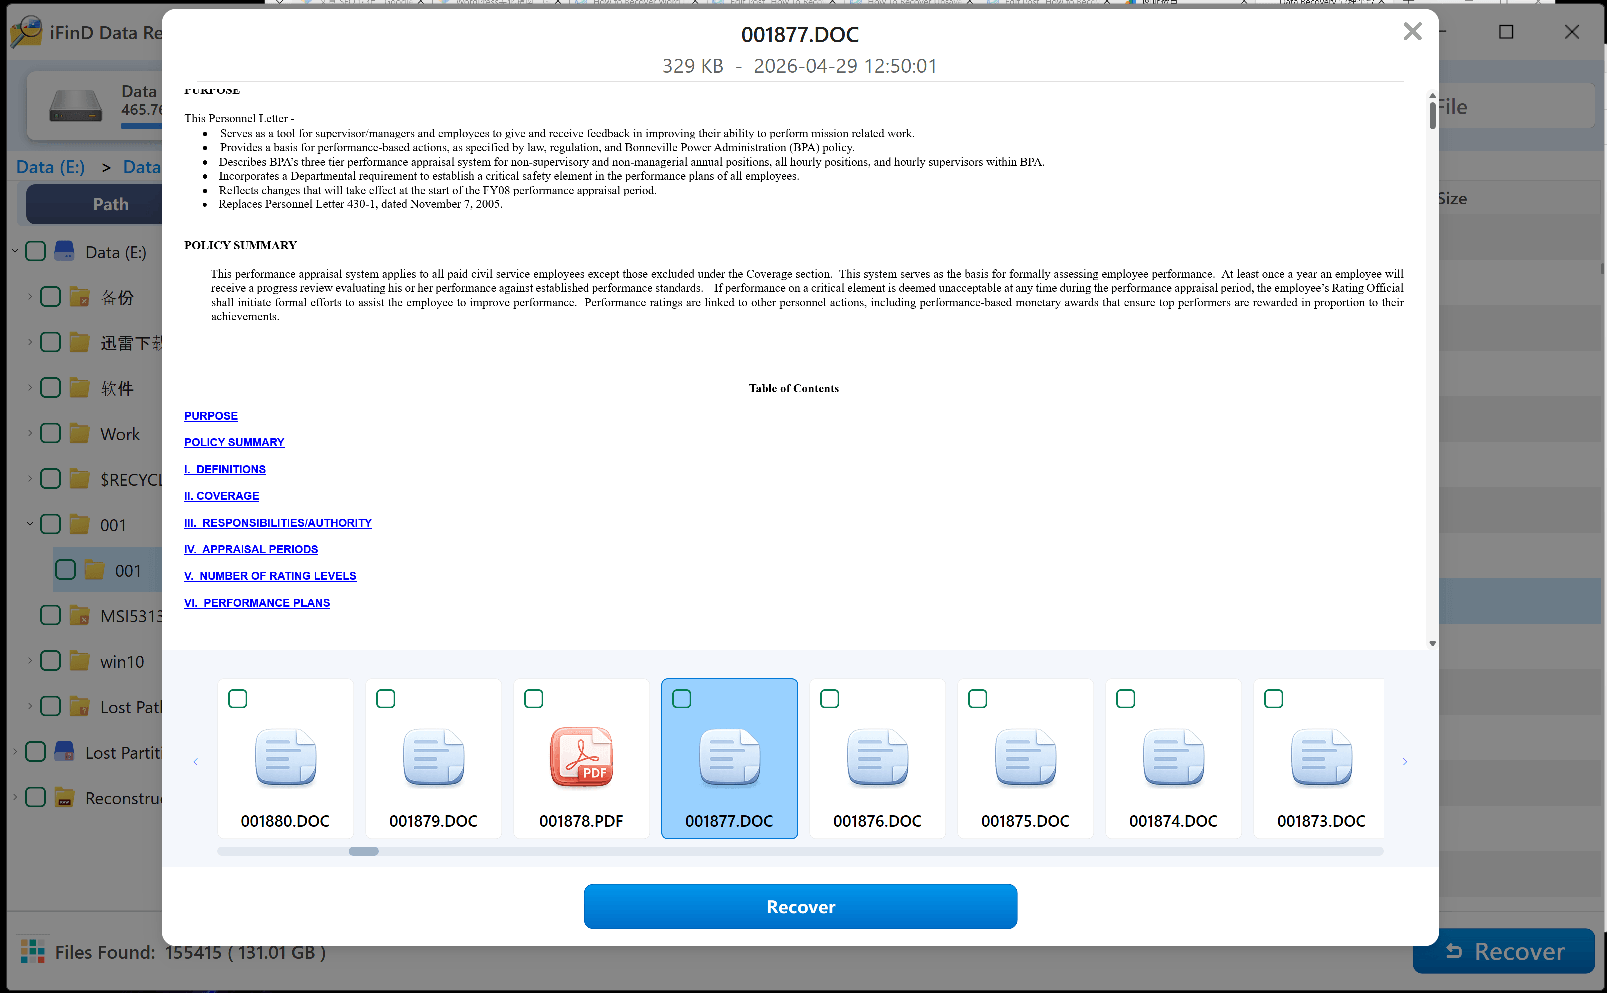
⚠️ Important: Do not save the recovered Word documents back to the same partition where they were lost. Always choose a different drive or an external USB to prevent overwriting.
Besides Word documents, iFinD Data Recovery can also help you restore other Office files when important business data goes missing. If you've lost spreadsheets, you can use the same deep-scan approach to recover Excel files. The same goes for presentations—check out our guide on how to recover PowerPoint files for step-by-step instructions tailored to that format.
4. Method 2: Recover Unsaved Word Documents with AutoRecover
Word crashed. Power went out. You accidentally clicked "Don't Save." Whatever just happened, don't panic—Microsoft Word's built-in AutoRecover feature usually has your back. The steps to get your file back depend on one thing: did you save the document at least once before things went wrong?
If you were editing a previously saved document
Already named and saved the file before, but Word crashed while you were adding new content? Recovery is usually automatic.
- Reopen Microsoft Word, or double-click your original file.
- Check the left side of the screen. Word should display the Document Recovery task pane automatically.
- You'll see a list of recovered files with timestamps showing when they were last auto-saved.
- Click the file to open it, review the changes, and immediately click Save As to lock in your work.
If it was a brand-new document you never saved
Created a blank document, started typing, and Word crashed before you ever hit Save? The Document Recovery pane might not appear. Instead, your draft is tucked away in a hidden system folder.
- Open Microsoft Word and create a blank document.
- Click the File tab in the top-left corner.
- Select Info from the left-hand menu.
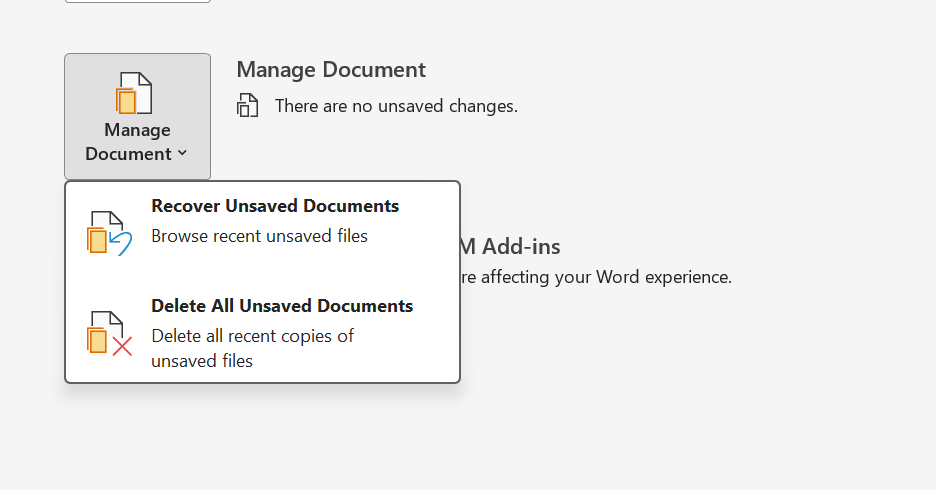
- Click the Manage Document button (the folder icon with a gear).
- From the drop-down menu, select Recover Unsaved Documents.
- A dialog box will open showing the
UnsavedFilesfolder. Look for any.asdfiles matching the time of the crash. - Select the file, click Open, and immediately save it as a proper
.docxso you don't lose it again.
💡 Tip: Where are AutoRecover files actually stored?
If the menus above don't work, you can go hunting manually in Windows File Explorer. Make sure "Show hidden files" is turned on, then check these two paths:
- For mid-edit crashes:
C:\Users\Username\AppData\Roaming\Microsoft\Word - For never-saved drafts:
C:\Users\Username\AppData\Local\Microsoft\Office\UnsavedFiles
Note: The second path is exactly what "Recover Unsaved Documents" already checks—manually browsing there won't find anything extra. But the first path (Roaming) is worth checking manually even if the Document Recovery pane never appeared, since Word doesn't always show that pane reliably.
⚠️ What if the AutoRecover folder is empty?
If your system cleaned up temporary files or the crash corrupted the save process, the .asd files might be missing from the standard folders. When that happens, your last resort is to jump back to Method 1 and use iFinD Data Recovery to perform a deep scan of the drive. A thorough hard drive recovery scan can often find orphaned .asd or .tmp fragments that the standard AutoRecover paths no longer show.
5. Method 3: Recover Deleted Word Documents from the Recycle Bin
Before you try anything else, check the Recycle Bin. When you delete a file the normal way, Windows doesn't actually erase it—it just moves it to the bin. Unless you've emptied it since, your Word document is probably still sitting there. If it's not, you'll need to go deeper with a proper file recovery scan, but the bin is the fastest first stop.
Here's how to get it back:
- Double-click the Recycle Bin icon on your Windows desktop.
- Locate your deleted Word document.
Pro Tip: If your Recycle Bin is full of junk, click the Date Deleted column header to bring the most recently deleted files to the top, or type.docxin the top-right search bar. - Once you find the missing file, right-click on it.
- Select Restore from the drop-down menu.
The document will disappear from the Recycle Bin and reappear in the exact folder where it was originally stored.
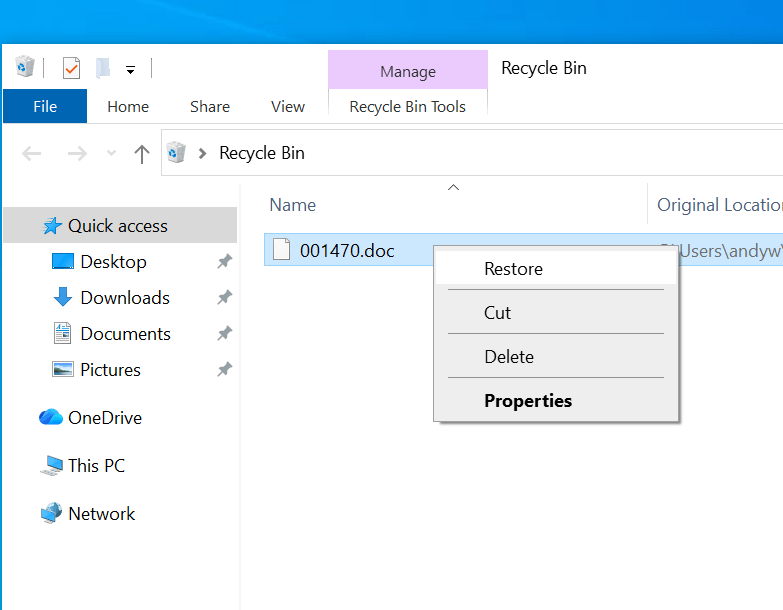
⚠️ What if the file isn't in the Recycle Bin?
The Recycle Bin can't help you in three situations:
- You used
Shift + Delete(which skips the bin entirely). - You manually emptied the Recycle Bin.
- The file was deleted from a USB flash drive or SD card—removable drives usually bypass the Windows Recycle Bin.
If any of these apply, Windows considers the file permanently deleted. But here's the thing: "permanently deleted" doesn't mean gone forever. The underlying data is usually still on your drive—Windows just marked that space as free. Stop using the device immediately, then jump to Method 1 (iFinD Data Recovery) to scan the disk and pull the raw data back before anything overwrites it.
6. Method 2: Repair Corrupted Word Files with Microsoft Word Open and Repair
Seeing "Word found unreadable content" or "The file is corrupted and cannot be opened"? Before you try anything else, start with the repair tool already built into Microsoft Word. It's designed to fix minor structural damage or XML errors inside a .docx file—and in many cases, that's all it takes to get your document back. If the file is too far gone, you can always fall back on a broader data recovery approach to find an older, healthy version.
Note: Don't try to open the damaged file by double-clicking it from your desktop or folder. You need to launch Word first to access this hidden repair feature.
- Open the Microsoft Word application and create a blank document.
(This gives you access to Word's internal file browser—you need this to bypass the default double-click error.) - Click the File tab in the top-left corner of the ribbon.
- Select Open from the left sidebar, then click Browse.
- In the file explorer window that appears, navigate to the folder where your corrupted document is stored.
- Click once on the corrupted Word file to highlight it.
⚠️ Warning: Don't double-click—that'll just trigger the same error again. - Look at the bottom of the dialog box. Instead of clicking the main "Open" button, click the small drop-down arrow right next to it.
- From the drop-down menu, select Open and Repair.
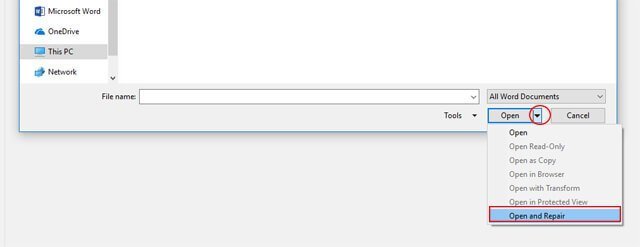
Word will now scan the document's underlying structure and attempt to rebuild any broken elements. If the file opens successfully, don't just hit Save. Go straight to File > Save As and save it as a brand new document with a different name—this way you leave the damaged file container behind and work from a clean copy.
⚠️ What if Open and Repair fails?
If Word still throws an error, it usually means the internal file damage is too severe for the built-in tool to handle. When that happens, your best bet is to abandon the formatting and salvage the raw text. Jump down to Method 5 (Recover Text from Any File) to extract whatever content you can.
7. Method 5: Extract Text from a Severely Corrupted Word Document
If Word's "Open and Repair" didn't work, the file's internal structure is too damaged for normal recovery. But that doesn't mean your text is gone. The words you typed live inside the document.xml file within the .docx container, and even when the XML tags are broken, the raw text often survives. Word has a hidden tool—Recover Text from Any File—that ignores the broken structure entirely and pulls out whatever readable characters it can find.
Here's how to use it:
- Open Microsoft Word and create a blank document.
- Click File > Open > Browse.
- Navigate to the folder containing your corrupted Word document.
- The critical step: Look at the file type drop-down menu in the bottom-right corner of the window (it usually defaults to All Word Documents). Click it to open the list.
- Scroll through the list and select Recover Text from Any File (*.*).
- Now, select your corrupted file and click Open.
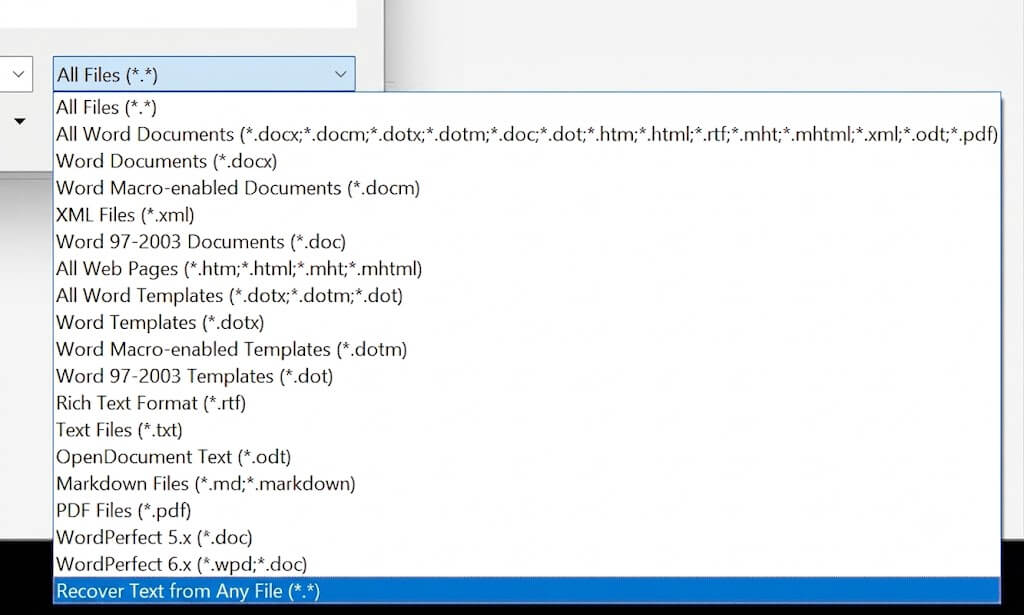
⚠️ What to expect from the recovered result:
Because this tool strips away all XML formatting, you will lose images, tables, bold/italic styling, and page layouts. You'll also likely see some random symbols or binary junk at the very beginning and end of the document—just delete that part manually. The core text you wrote should be intact, and that's what you're here to save.
💡 What if the extracted text is completely blank or 100% gibberish?
If the extraction comes back empty, the damage goes deeper than the XML tags—the text data itself is either too fragmented to read or was physically overwritten on the drive. (In rare cases, encryption or malware can also scramble the content beyond recovery.)
At this point, the current file is a dead end. Your last options: hunt down a hidden .tmp temporary file (see Method 2: AutoRecover), or use iFinD Data Recovery (Method 1) to deep-scan the drive for an older, uncorrupted backup draft. If you need a broader look at recovery strategies, this data recovery guide covers additional approaches.
8. Method 6. Recover an Overwritten Word Document (Previous Versions)
You deleted a key paragraph, hit Ctrl + S by habit, and closed the file. Now the old version is gone—or at least it looks that way. Standard undelete tools can't help here because you actively saved over the original data. But there's one built-in Windows feature that might still save you: Previous Versions. One catch—it only works if File History or System Protection was already turned on for that drive before the overwrite happened. If it wasn't, skip straight to Method 1 and try a deep scan for leftover temporary files instead.
Here's how to check if a previous version is available:
- Navigate to the folder where your overwritten Word document is saved.
- Right-click directly on the Word file.
(Note for Windows 11 users: You may need to click Show more options at the bottom of the right-click menu to see the full list.) - From the context menu, select Restore previous versions.
(Alternatively, you can select Properties and then click the Previous Versions tab. If this option is missing on your Windows build, try searching for the File History app in your Start menu.) - A list of available older versions will appear, complete with dates and times. Pick the version from before you made the accidental changes.
- Crucial Step: Don't click "Restore" right away—that will overwrite your current file. Instead, click the Copy… button. Save the older version to a new location (like your Desktop), then open both files side by side and compare before deciding what to keep.
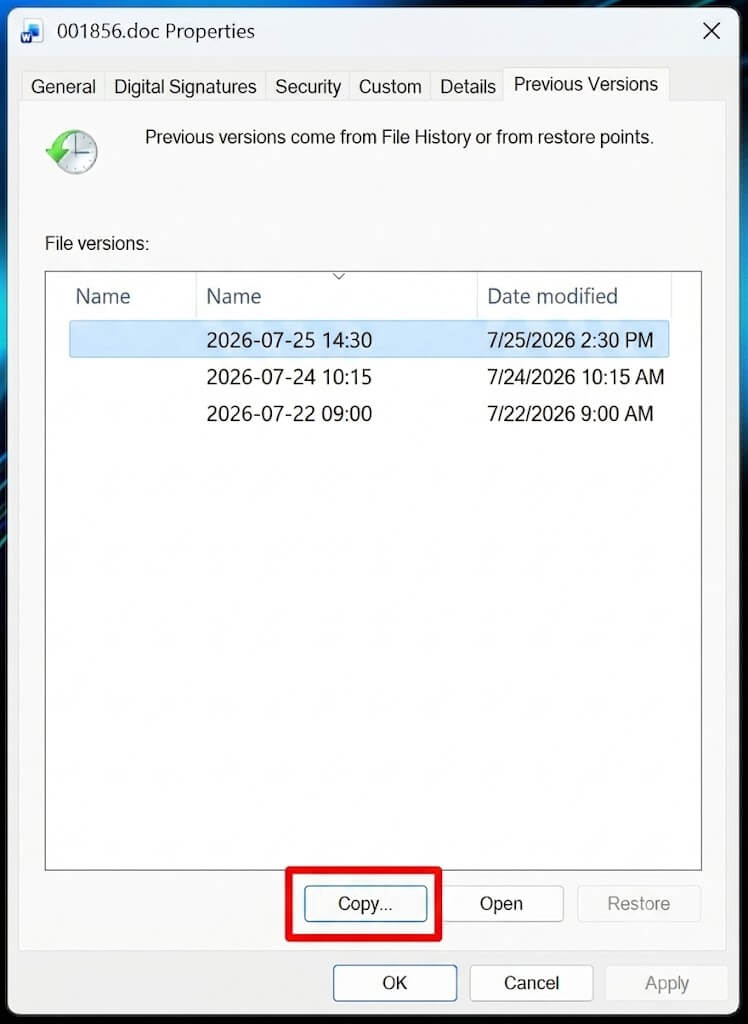
⚠️ What if it says "There are no previous versions available"?
This means File History or System Protection wasn't backing up this drive before the overwrite. There's no older snapshot to roll back to.
If you're stuck, try iFinD Data Recovery (Method 1) and run a deep scan of the drive. Recovery software can't undo the overwrite itself—those sectors have already been replaced—but it can often find .tmp temporary files or AutoRecover .asd fragments that Word saved to different physical locations on the disk while you were working. If even that turns up empty, a broader data recovery guide may help you explore what else is recoverable from the drive.
9. Method 7. Fix Disk Errors That Cause Word File Corruption
Sometimes the problem isn't the Word document—it's the drive it lives on. This method is worth trying if you're seeing repeated file corruption across multiple documents on the same disk, or if Windows keeps prompting you to format a USB drive. Windows has a built-in command-line tool called CHKDSK (Check Disk) that can repair these structural issues.
⚠️ CRITICAL WARNING: Recover Data BEFORE Running CHKDSK
CHKDSK writes changes directly to your drive. Its goal is to make the drive healthy, not to protect your files. During the repair, CHKDSK can delete, truncate, or convert damaged Word file fragments into unreadable .chk files—making future recovery impossible.
If your lost Word document is important, stop and use iFinD Data Recovery (Method 1) to extract the raw files in read-only mode first. Only proceed with CHKDSK after your data is safe. If you need a broader overview of safe recovery steps, this data recovery guide can help.
With your data safely backed up, here's how to run CHKDSK and repair the drive:
- Type cmd into the Windows search bar.
- Right-click Command Prompt and select Run as administrator.
- In the command window, type the following and press Enter:
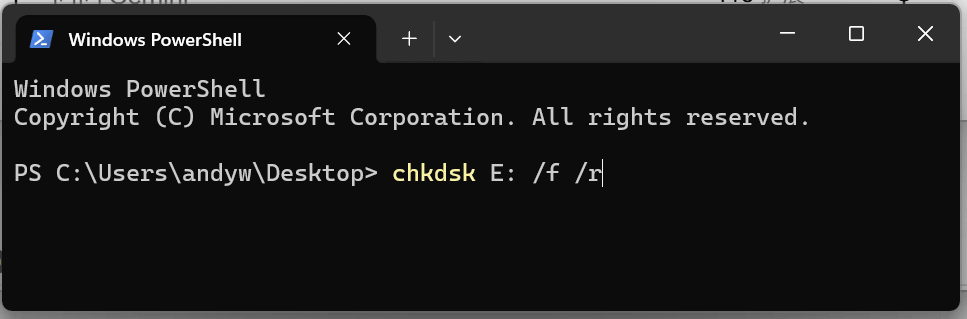
chkdsk E: /f /r
(ReplaceE:with your actual drive letter./ftells Windows to fix file system errors./rlocates bad sectors and tries to recover readable data from them—but unreadable fragments may be discarded or turned into.chkfiles, which is why you backed up first.) - Wait for the scan to finish. If you're scanning the system drive (
C:), Windows will ask to schedule the scan for the next restart. TypeY, press Enter, and reboot.
10. Bonus: How to Prevent Word Document Loss in the Future
Recovery tools like iFinD Data Recovery can pull you out of a tight spot, but the best fix is not needing one. Here are four habits that make losing a Word document far less likely:
- Reduce the AutoRecover Interval: By default, Word saves AutoRecover data every 10 minutes. That's a lot of typing you could lose. Go to File > Options > Save, and change "Save AutoRecover information every X minutes" to 1 minute.
- Enable the Hidden ".wbk" Backup Feature: Word has a legacy feature that creates a local backup copy automatically. Go to File > Options > Advanced, scroll down to the Save section, and check the box for Always create backup copy. Word will save a secondary
.wbkfile in the same folder every time you hit Save. - Save to a Cloud Folder: Keeping your working documents in OneDrive enables Word's real-time "AutoSave" toggle (top-left corner) and gives you instant access to cloud-based Version History. Google Drive works too—it won't trigger Word's AutoSave, but it keeps its own file version history.
- Safely Eject Removable Drives: As mentioned in the disk error section, yanking out a USB flash drive or SD card while a Word file is still open—even in the background—is the top cause of corrupted file systems. Always use the "Safely Remove Hardware" option in the Windows taskbar.
💡 Summary:
Hardware fails, power goes out, and mistakes happen. But with these Word settings dialed in and a backup routine you actually stick to, you'll spend a lot less time panicking over lost documents—and a lot more time getting your work done.
Word documents aren't the only files that can disappear. Emails, Excel spreadsheets, and PowerPoint presentations often get deleted by accident, lost in a crash, or wiped by storage problems. If you need to recover deleted emails, check out our complete email recovery guide.
11. Frequently Asked Questions (FAQs)
Can I recover a Word document that was never saved?
Yes. If Word crashed before you could save a new document, the built-in AutoRecover feature likely saved a draft. You can find it by opening Word and going to File > Info > Manage Document > Recover Unsaved Documents (see Method 2 for detailed steps).
Where are Word temporary files (.tmp) actually stored?
It depends on what kind of file it was. For brand-new, never-saved documents, check: C:\Users\Username\AppData\Local\Microsoft\Office\UnsavedFiles. For files you'd saved before and were editing when Word crashed, check: C:\Users\Username\AppData\Roaming\Microsoft\Word.
Note: Files in the Roaming folder aren't always easy to identify or open manually. If Word crashed mid-edit, the simplest fix is usually to just reopen Word or double-click the original file—the Document Recovery pane should appear on its own (see Method 2 for the full walkthrough).
Is it possible to recover a permanently deleted Word file (Shift + Delete)?
Yes. Using Shift + Delete or emptying the Recycle Bin only removes the file's index from the Windows file system—the actual data stays on the disk until something overwrites it. As long as you stop using the drive right away, you can use a professional tool like iFinD Data Recovery to scan the disk and pull the file back.
Pro Tip: If your Word file was permanently deleted from a Solid-State Drive (SSD), the Windows TRIM command can wipe the data quickly. Learn more about handling this scenario in our complete SSD Data Recovery Guide.
Why is my recovered Word document full of random symbols and gibberish?
This usually means the document's internal XML structure is badly corrupted or fragmented, so Word can't interpret the contents properly. To fix it, use the "Recover Text from Any File" converter in the Word Open dialog (explained in Method 5)—it strips away the broken formatting and pulls out whatever readable text is left.
Pro Tip: File corruption often happens when using unstable external storage. If your document was corrupted on a removable memory card, our SD Card Recovery Guide has hardware-specific repair steps.
Can I recover an overwritten Word document if I don't have Previous Versions enabled?
If you don't have File History or a backup, you can't undo the overwrite itself—those sectors have already been replaced by the new save. But there's still hope: Word creates hidden temporary files (.tmp and .asd) in the background while you type. Running a deep scan with iFinD Data Recovery can sometimes find one of these leftover drafts sitting on a different part of the disk.
If you want to prevent this from happening again, enabling Word's Always create backup copy feature (see Section 10) will keep a .wbk backup of the previous version every time you save.