Last Updated on August 6, 2026 by andy woo
Files deleted from your hard drive? HDD suddenly showing as inaccessible or asking to be formatted? Don’t panic—in most cases, your data is still physically on the drive. The key is to stop using the disk immediately and follow the right hard drive recovery steps.
This guide covers three methods that work for internal hard drives, external HDDs, SSDs, and USB drives alike. You’ll start with the fastest free options—the Recycle Bin and Windows File History—then move to professional-grade recovery for formatted disks, corrupted partitions, or completely inaccessible drives. If you’re dealing with portable storage specifically, we also have dedicated guides for external hard drive data recovery and USB flash drive recovery.
- 01 1. When Do You Need Hard Drive Data Recovery?
- 02 2. Method 1: Recover Deleted Files from the Recycle Bin
- 03 3. Method 2: Restore Files from Windows Backup
- 04 4. Method 3: Recover Hard Drive Data Using iFinD Data Recovery Software
- 05 5. Related Hard Drive Recovery Scenarios
- 06 6. How to Prevent Hard Drive Data Loss
- 07 7. Frequently Asked Questions
When Do You Need Hard Drive Data Recovery?
Hard drive data recovery is usually needed when files become inaccessible because of accidental deletion, formatting errors, partition problems, or hardware failures.
Common situations where you may need to recover data from a hard drive include:
- Accidentally deleted files or folders
- Formatted HDD or SSD data recovery
- Corrupted or damaged partitions
- Hard drive showing RAW file system
- External hard drive not detected by Windows
- Failed hard drive with important files
In these cases, using professional data recovery software can help scan the drive and recover lost files before they are permanently overwritten.
Here are the most common scenarios that lead to data loss on a hard drive:
Hardware Failure
Hard drives can fail at the end of their lifespan, but failure also happens from mishandling, power surges, fire, or water damage that destroys internal components or makes the drive completely dead.
💡 Physical Damage Note: If the hard drive is physically damaged—making clicking sounds, not spinning up, or failing to be detected by the computer—professional recovery services may be required. You can check our guide to data recovery costs to understand the factors that affect recovery pricing.
Formatting
Formatting happens when you format your PC while installing Windows, or when you format a non-boot volume or external hard drive—wiping the file system index in the process.
Corruption
Corruption occurs when an internal hard drive’s file system gets damaged. In such cases, Windows won’t boot because of damage to the master boot record or boot configuration data.
Deletion
This is the most common data loss scenario. You delete files—documents, photos, videos, emails, audio, or archives—that go to the Recycle Bin, but then empty the bin without checking its contents. If you accidentally deleted files from your hard drive, you can follow our deleted files recovery guide.
Method 1: Recover Deleted Files from the Recycle Bin
This is the fastest and easiest method to recover data from the recycle bin. When you delete files from your computer the normal way, they go directly to the Recycle Bin instead of being permanently deleted. The only exceptions are files too large to fit in the bin, or when the bin is already full.
Checking the Recycle Bin should always be your first step before trying anything else:
1. Open the Recycle Bin on your computer.
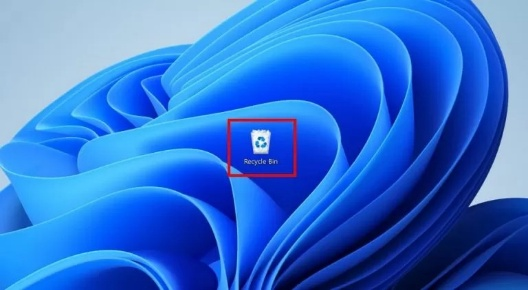
2. As the window opens, you will see all recoverable deleted files. Locate the files you want to get back.
3. Right-click your file and select “Restore” to retrieve it back to its original location on your hard drive.
Pro Tip: If you want to recover multiple files at once, hold down the Ctrl key and select all desired files before right-clicking to restore them.
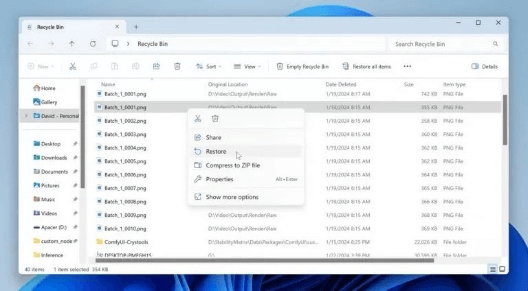
All the deleted files will be returned to their original locations as soon as you click Restore.
If you are unable to recover files from the Recycle Bin, try the next method below.
Method 2: Restore Files from Windows Backup
This method only works if you set up a backup before the data loss occurred. Windows includes a built-in backup utility called File History that takes snapshots of your files and lets you restore earlier versions. Note: File History only backs up files in your Libraries, Desktop, Contacts, and Favorites by default. If your lost files were stored elsewhere, they may not be included unless you manually added those folders to File History.
If you had File History enabled, follow these steps to restore your files:
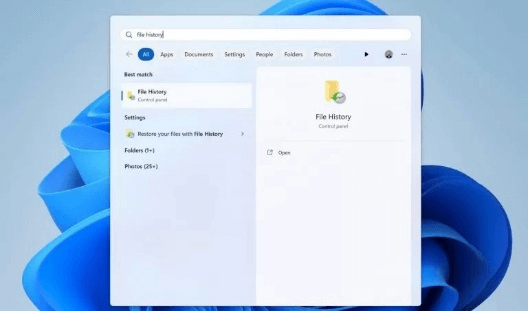
1. Open the Start menu, type file history in the search bar, and select Restore your files with File History from the search results.
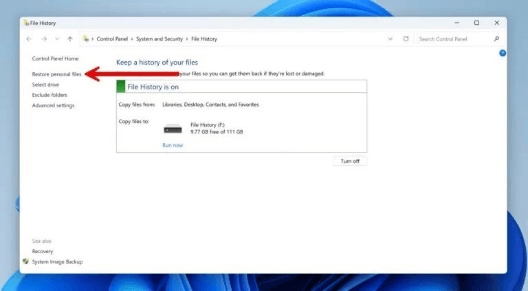
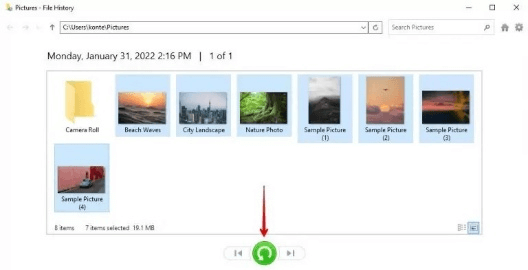
2. Click on the Restore personal files option from the File History Control Panel window.
3. Navigate to the folder where your files were originally stored. Use the navigation arrows at the bottom to cycle through different backup versions until you reach a point in time when the missing files were present.
4. Select the specific files or folders you want to recover.
5. Click the green Restore button. As the restore process completes, all selected files will be safely returned to their original folder.
4. Method 3: Recover Lost Hard Drive Data with iFinD Data Recovery
When the Recycle Bin is empty and File History wasn't enabled, professional data recovery software is your most reliable option. iFinD Data Recovery scans your drive at the sector level to find and rebuild lost files—even from formatted disks, corrupted partitions, or drives that Windows can no longer read.
STEP 1 Download and Install iFinD Data Recovery
Download and install iFinD Data Recovery from the official website. The setup takes a few minutes and requires no technical background. You can recover up to 1 GB of data for free to test the results before purchasing.
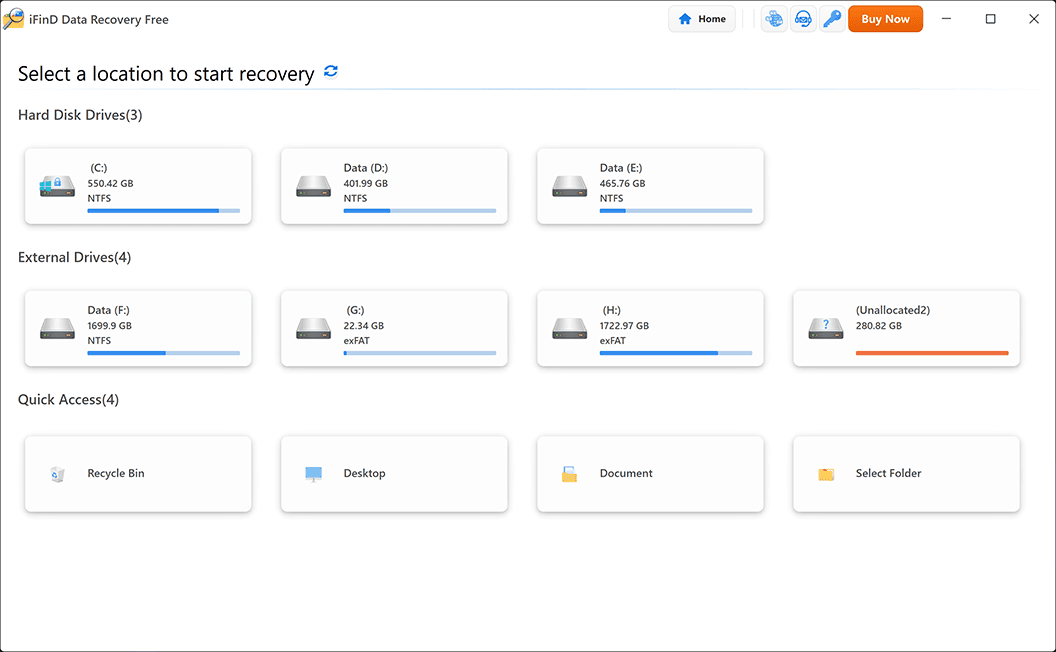
STEP 2 Launch iFinD Data Recovery and Select the Drive
Launch iFinD Data Recovery on your computer. After selecting a recovery mode, you'll see a list of available drives. Carefully choose the hard drive or partition where your lost files were stored.
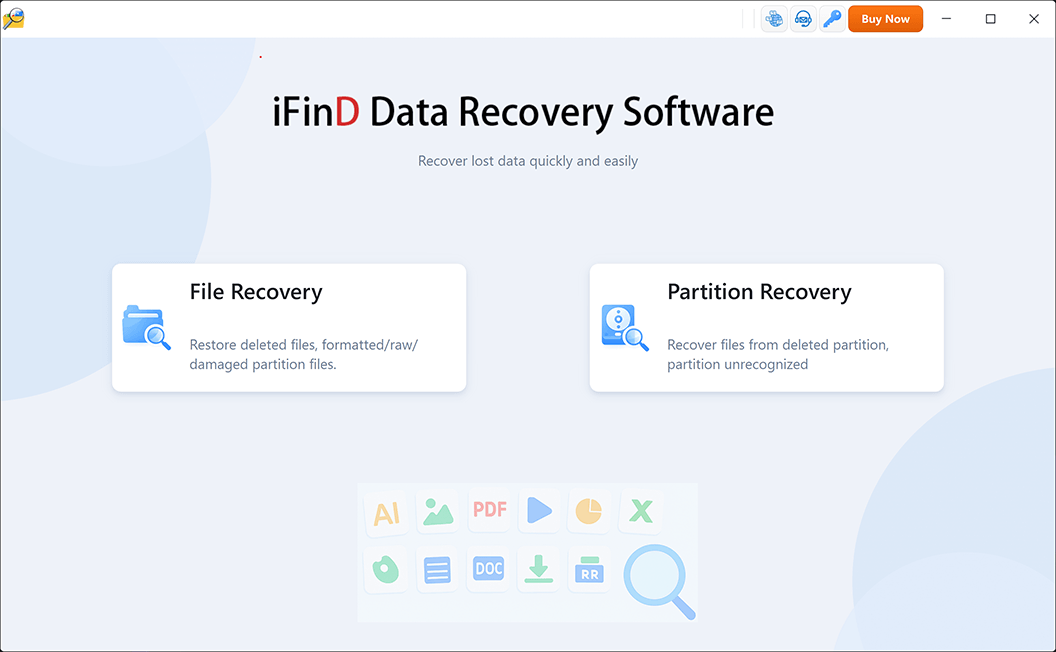
STEP 3 Choose File Recovery or Partition Recovery Mode
Pick the recovery mode that matches your data loss scenario:
Option 1: File Recovery
Best for accidentally deleted files or files lost while the partition is still intact and accessible. Choose File Recovery when your drive still shows up normally in Windows but files have gone missing.
Option 2: Partition Recovery
Use this when a partition is damaged, corrupted, or missing entirely—it can pull data from lost or inaccessible drives. Choose Partition Recovery if your drive letter has disappeared or Windows asks you to format the disk.
STEP 4 Scan the Drive for Recoverable Files
Start the scan. iFinD Data Recovery thoroughly searches the drive using advanced algorithms to locate all recoverable files.
During the scan, you have these options:
- Pause: Temporarily stop the scan to check if your files have already appeared. Click Resume to continue scanning for more.
- Cancel: Stop the scan and return to the drive selection screen. Use carefully—this aborts the current scan.
- Real-time Display: Watch a live counter of found files organized by type (pictures, media, compressed files, documents) as the scan progresses.
STEP 5 Preview and Recover Lost Files
Once the scan finishes, select the files you want to recover and click Recover. Choose a safe location to save them—preferably a different drive from the one being recovered.
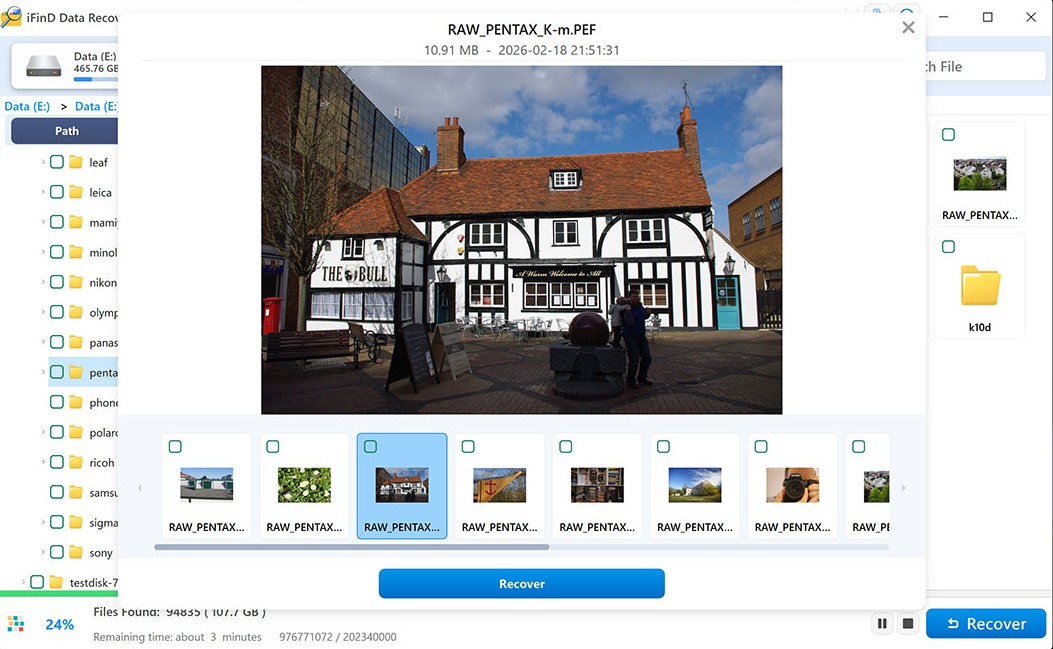
⚠️ Important: Do not save recovered files back to the same drive or partition they were lost from. Writing to the source drive can overwrite the remaining recoverable data. Always save to a different drive or external storage device.
Key Features of iFinD Data Recovery Software
iFinD is a reliable solution to recover deleted photos from SD card without spending a penny upfront. Key reasons to choose iFinD software include:
- Effectively recover documents, folders, emails, videos, and 2,000+ file types.
- Recover permanently lost data across multiple devices and sources, including digital cameras, Recycle Bin, HDDs, SSDs, and raw partitions.
- Restore accidentally deleted data caused by formatting, system crashes, or virus attacks with just a few simple clicks.
- Automatically save scan history during each session for convenient future recovery.
- iFinD Data Recovery supports file recovery from formatted, corrupted, or inaccessible hard drives. If your hard drive partition is missing or accidentally deleted, you can also try Partition Recovery to restore lost partitions and recover your files.
Related Hard Drive Recovery Scenarios
Hard drive data loss comes in many forms. Depending on your specific situation, you may need a more targeted approach:
Formatted Drive Recovery
Accidentally formatted a drive? Learn how to recover data before it's overwritten.
External Hard Drive Recovery
External HDD not recognized? Here's how to recover data from portable drives.
SSD Data Recovery
SSDs handle deletion differently. Learn about TRIM and how to recover SSD data.
RAID Data Recovery
RAID array failed? Step-by-step virtual reconstruction guide.
How to Prevent Hard Drive Data Loss
Although deleted files can often be recovered, preventing data loss is always easier than recovering it. Here are some practical tips to protect your hard drive data:
- Back up important files regularly using Windows Backup or cloud storage.
- Avoid formatting a drive unless you have confirmed that all important data has been copied.
- Stop using the hard drive immediately after accidental deletion to prevent overwriting lost files.
- Keep software updated, including your operating system and antivirus protection.
- Monitor hard drive health using SMART status to detect potential hardware failures early.
- Create a recovery drive or system image for emergency situations.
Following these practices can significantly reduce the risk of permanent data loss and improve your chances of successful recovery if problems occur.
Frequently Asked Questions (FAQs)
Q1. How can I recover a formatted hard drive using CMD?
The Windows File Recovery tool, available free from the Microsoft Store, allows you to recover data from a formatted hard drive using command-line commands. Here's how:
- Install Windows File Recovery from the Microsoft Store.
- Launch Command Prompt (CMD) as an Administrator.
- Enter the recovery command using the format: winfr source-drive: destination-drive: [switches]
Full syntax details are available on Microsoft's official documentation. Note that this tool has a learning curve. If you prefer a graphical interface, iFinD Data Recovery performs the same deep scan with an easier workflow.
Q2. Which is the most effective way to recover data from a formatted hard disk without software?
Recovering data from a formatted hard disk without software is highly challenging. The most effective method is restoring files from a previously created backup (such as Windows Backup, File History, or cloud storage).
If you have no backup and the data loss is critical, contacting a professional local data recovery laboratory becomes your next viable option.
Q3. How is it possible to recover a formatted external hard drive?
Recovering data from a formatted external hard drive follows a process similar to recovering internal drives. The key factor is to start the recovery process immediately before new data overwrites the lost files. For step-by-step instructions, see our external hard drive recovery guide.
Q4. Can I recover data if the formatted hard drive was part of a RAID array?
Yes, but the process is significantly more complex than dealing with a standard single drive. If you accidentally formatted a drive that belongs to a NAS or a RAID system (such as RAID 0, 1, or 5), the logical structure of the entire array is broken. You must stop using the server immediately to prevent the parity data from being overwritten. Do not attempt to force a rebuild. Instead, you need specialized software capable of virtual array reconstruction. For step-by-step instructions, refer to our comprehensive guide on RAID data recovery.
Q5. Does a "Quick Format" permanently erase all data on my hard drive?
No, it does not. When you perform a standard "Quick Format" in Windows, the operating system only deletes the file system table (the directory that points to where your files are stored). This makes the hard drive appear empty and ready for new files. However, the actual original data remains perfectly intact on the physical sectors of the disk. As long as you do not save new files to the drive (which would overwrite the old data), professional recovery software can easily scan the raw sectors and restore your files. If you need to recover a drive that was accidentally reformatted, our partition recovery guide walks through the process.
Summary: Which Hard Drive Recovery Method Should You Use?
Your best recovery path depends entirely on how you lost the data:
- Files deleted normally? → Check the Recycle Bin first. It takes seconds and costs nothing.
- Recycle Bin emptied, but File History was on? → Restore from Windows Backup. This works for files in backed-up folders.
- Drive formatted, corrupted, or completely inaccessible? → Use iFinD Data Recovery. A deep scan reads the raw disk sectors directly, bypassing the broken file system.
Whatever method you choose, the most important rule stays the same: stop using the drive the moment you notice data loss. Every new write is a chance for your old files to be overwritten permanently.